
I made a fully electric hovercraft I made from wood, foam, and duct tape, that I can actually climb aboard and drive around. My original plan was to build a full size hovercraft to lift my weight and drive like a proper vehicle with throttle levers and a steering wheel.
However this was never going to be easy and, as well as this being the biggest project on this channel to date, this would also end up being my most challenging, complicated and sketchy video yet… And, yes, remember I’m someone who’s strapped rockets to a flying knife before.
This would be a real challenge to complete within my normal 30 day limit to get videos out every month on this channel, but I’d have some help from my friend DIY perks and also my Dad, who’s always wanted to build a hovercraft himself. So, why not build one and then let him take the wheel to see his reaction?
Prototype Build
My goal was to build the simplest and smallest hovercraft I could, so had to think carefully about designing it. The first step was to build a small model of the hovercraft to see if I could perfect a design in minature before scaling it up.
I designed some paper templates and then got to work quickly cutting parts from foamboard that could be glued together around the electronics which were stolen straight from and RC jet plane. This is an Electric Ducted Fan which simulated a jet engine using a very powerful brushless motor to spin the blades round and produce loads of thrust.
I wanted to use something small and compact and also this is way cooler than a normal propeller. I next cut the skirt from a bin bag I had lying around and taped it to the hull and then it was time for a test. After some trial and error I found this skirt shape worked best which is where it basically forms a donut that gets pumped with air using small ducts.
Simply, air is fed into the donut through the intakes and then is escapes into the centre, where it meets the rest of the high pressure air trapped within the skirt. Next I added a rear motor for forwards propultion along with rudders for steering and went to see how well it drove around outside. It worked really smoothly over concrete and even managed to make a perelous water crossing of a big puddle.
Full Size Build
Okay so next I needed to figure out how I was going to build the full size hovercraft. I wanted it to be lightweight and compact, so I could build it in my small workshop and lift it through the door, so opted for some insulation foam. I made some more templates and rounded the corners with a jigsaw.
Next I added more foam to double up the perimeter of the hull where the donut shaped skirt would attach to. For added strength I glued strips of wood along the underside and top side and these would also double as hard points to mount things to such as the electronics.
Talking of electronics, I needed to figure out how much power I’d need to lift my 70 kg and the total mass of the hovercraft itself plus all of its heavy batteries. Firstly, I thought I’d see how much the most powerful motors I had in my workshop would lift. Even without a skirt, it seemed quite powerful.
The next thing to do was form a donut skirt from damp proof liner I got from the DIY shop and stick it to the hull using lots and lots and lots of duct tape. I also had to make some intakes for inflating it, but instead of 3d printing them which would have taken a while, I quickly bodged some together with foam board and glued them in place, so they’d take some of the prop wash and divert it.
I wasn’t too optimistic about it lifting my full weight, but I thought I’d try it anyway. What’s the worst that could happen? Ok, perhaps there was a safer and cooler alternative to having relatively large propellers spinning very close to my fingers and face.
So I ordered some new electronics and filled in the holes where the props had been. The electronics arrived and now I had the small task of soldering connectors to the eight batteries and 110A speed controllers.
I needed such large speed controllers as these electric ducted fans would be seriously power hungry and would run on eight cells, so 30 volts each! That’s a lot of current. I glued in the fans and used more offcuts of pvc as intake ducts for inflating the donut skirt.
These electroncis were quite expensive so I didn’t want to burn them out or find out they weren’t going to work as expected, but the only way to find out was to climb aboard and power it up! Alright so that’s the main thing sorted, but how was I going to make the hovercraft move?
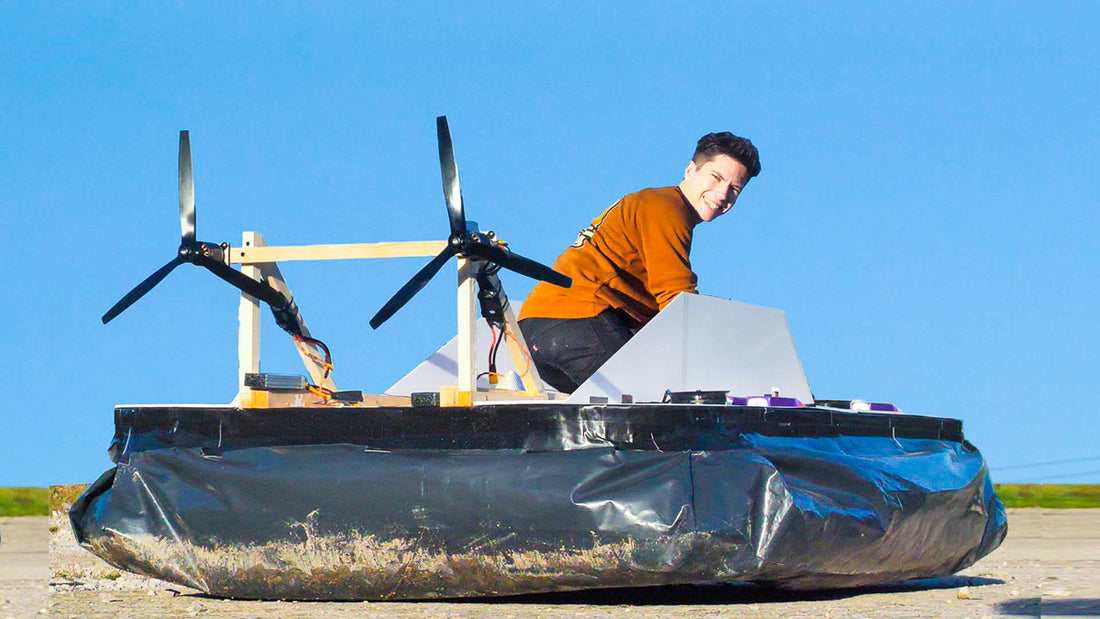
Well I decided to build a sturdy wooden structure and copy my scale model by putting a motor at the back with a propeller… buuuut to give it more thrust I decided to x2 this.
Next, how was I going to steer it? Well firstly I made a steering wheel out of pvc pipes and assembled a dashboard from some more wood. Next I could cut out some rudders from foam board to fit onto the motor structure and then I could give the motors a proper test run at full speed.
But you might be wondering, how was I going to connect the steering wheel to the rudders? For this I hooked up some aviation steel cable from an arm on the steering column to rc plane style control horns on the tail. Simple! I also made some throttle leavers by hacking two servo testers and adding sliding potentiometers to the handles. You can read about how I did this on my website, link in the description.
With that, now I could excitedly wait for some decent british weather to come around so I could test the hovercraft outside for the first time and see how it handled. As you will have seen from the video, the hovercraft worked very well but with room for improvement on the steering mechanism.
1 comment
No