
Recently, I converted my RC aircraft carrier into a gigantic radio control Battleship, which is almost certainly the largest in the world - here's how.
Firstly, here are the YouTube video from the channel. If you want more detail on how I pulled off this gigantic project, read on.
Part 1
Part 2
The Aim
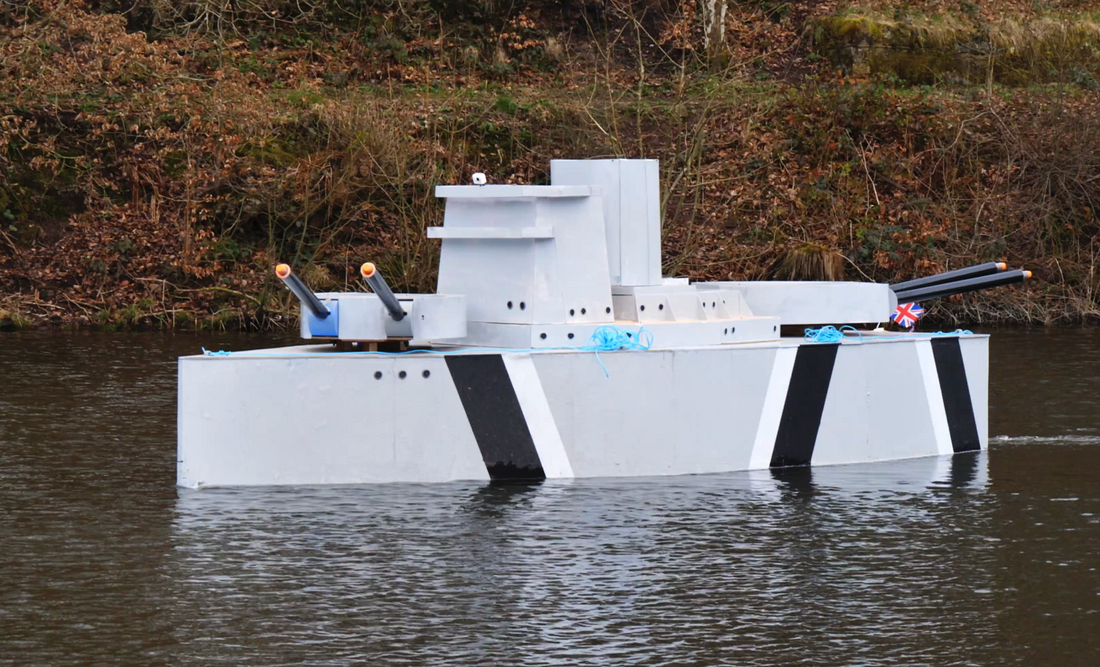
The aim of this project was to attempt to build the world's largest RC battleship, using the old hull of the aircraft carrier built for the Project Air Giant RC Aircraft Carrier video. With a total length of 17.5ft, with the overhanging turrets, it should beat this German RC Bismarck Battleship scale model, which has a total length of 16.4ft. This was, according to Google, the largest radio control battleship model in the world up to now.
Admittedly, this is a much nicer model than my crude foam and fibreglass dreadnought!
The Conversion
The idea was simple: cut down the RC carrier deck and fit it with working cannons, turrets and superstructure. As many comments on the video have pointed out, this is probably one of the few examples of a carrier-to-battleship conversion!

The cannons took a bit of figuring out, but in the end we went for a NERF-inspired design.

It consisted of PVC pipes fitted a 3d-printed plunger.

The foam darts were made from insulation piping. They had NERF-like orange tips that were 3d-printed on my Bambu Labs P1P.

Rubber strips were used over springs so we could adjust the power depending on how much rubber was used.

Later, the cannons would experience some pretty big failures due to overpowering them. This is one reason the power had to be toned down when it came to the actual lake tests. A shame, but we wanted to make sure the cannons would survive a full day of testing.
The first design had no O-rings, but these were later fitted to improve the seal and increase air pressure behind the dart.

The servo trigger mechanism was a hassle to figure out, and took another few iterations. To get it to be strong enough to hold the piston back, I printed at 100% infill and epoxied the parts in place. Once I epoxied these parts the wrong way up, meaning I had to print the cannon pivot and all the 100% infill parts again - very annoying!

Next I had to assemble 4x of these cannons, another time consuming process. In all, the cannons were a very difficult part of the project to get right, but I was happy with the result.
The turrets were another key aspect of the build we had to tackle.

A continuous rotation servo was used with a large 3d-printed gear to get enough torque to turn the heavy wooden structure fitted with two giant NERF cannons.

Again, I was pleased with how this turned out. If I were to go again, I'd probably try to make the whole thing a lot less fragile, though. Every time I pulled the pistons back, it felt like the whole thing was going to break.

The actual hull conversion was incredibly straightforward. All it required was to chop down the original rectangular deck and repaint the edges.

I underestimated how long the superstructure would take to put together, but I did have some help to paint it. The skin was simple foam board. It wouldn't be very resilient to water, but the paint would help protect it.

Finally, after many, many weeks, the boat was ready for a test. Now I just had to wait for good weather.

Wind was a big concern. As an aircraft carrier, the boat had been blown around quite a lot from the most gentle breeze.


Finally, the day had come, and we all had a great time playing around on the lake and testing out all of the battleship's features to proved it all worked.

Now we had shown the battleship in action, we could call the project complete - the world's largest RC warship actually worked.

I hope you enjoyed seeing this enormous project come to life. It was only ever meant to be a simple one, but it got a bit out of hand in the end!

For now, I've had enough of giant RC ships, so it's on to new engineering challenges... probably involving rockets. Keep a look-out for the next one on my Instagram.